


At Directsinks.com, we love blogs. We seek out knowledge that can help us be more efficient in helping our clients. Sometimes we will go on Houzz to see what advise other professionals are giving out regarding common issues. Today I came across a company that will swap out your sink in a day or two. This company is Ihatemysink.com and Joe Corlett,LLC. Below you will find the images and content from Joe himself:
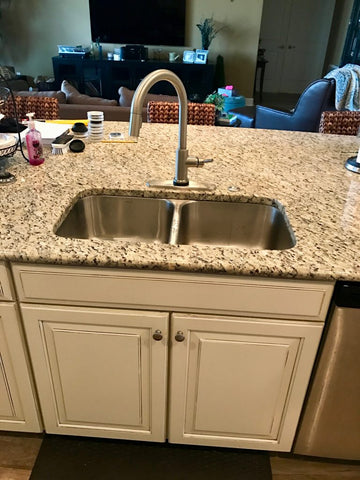
This double bowl stainless steel sink was changed to an apron front single bowl stainless.
I arrived at 9:38 a.m., had the sink removed by 9:59, the faucet and air switch gone at 10:08, and the cabinet front tapped off by 10:21.
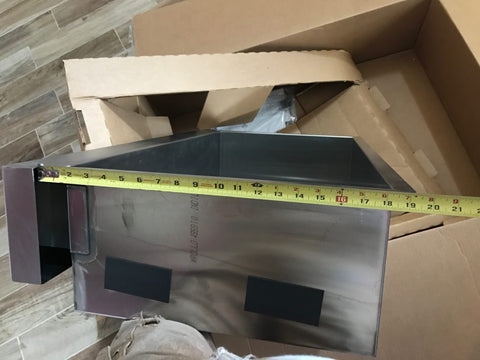
Before you can begin cutting stone, you have to know the dimensions over which you have no control. On this Kohler K-3943 that’s the distance from the back of the apron which will touch the cabinet front to the rear sink opening which is about 18 ¼”. You need this information to determine if you will have a positive or negative sink reveal and how large that reveal may be. I prefer the smallest possible positive reveal which is having the stone begin right after the curve at the sink flange and I don’t ask for customer opinion. Unlike a negative reveal which hides the flange completely and is much more forgiving, this requires very accurate measuring and cutting to look good. The trade-off is, I don’t have to round the bottom of the stone at the cut-out and there is no crud ledge created.
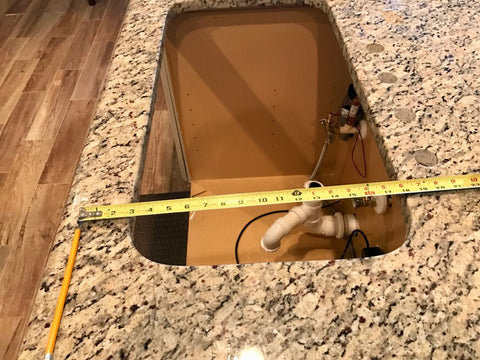
The pencil is sitting at 1 ¾”, which is the amount the top overhangs the cabinet front. From there, the rear of the sink cut-out measured about 17 5/8” which means I had to remove ¾” to get my 1/8” positive reveal. Of course, you’ve got to center the new sink cut-out in the cabinet perfectly.
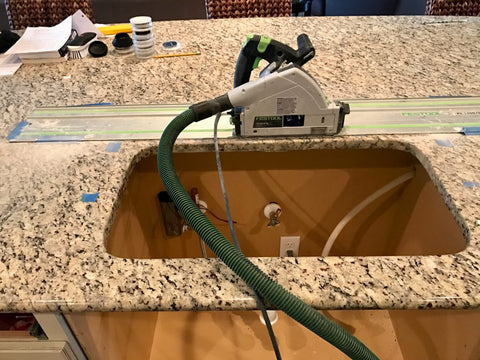
With a few business phone call interruptions, I started cutting stone at 11:15. My Festool rail saw only leaves that much dust on the countertop when you start cutting before you realize that you haven’t connected the vacuum hose. I repeated several passes to avoid over straining my saw. When you save the last 1/8” of stone for the last pass, the cuts are nearly dust-free. Remember to always cut the right side first so the front sink rail supports the saw rail. The rough opening, including nibbling the corners with my vacuumed grinder, was completed at 12:10 p.m. If you whack the corner before nibbling enough, you’ll be patching your cut-out, believe me.


When you cut the sides, sparks fly when you cut through the reinforcement rod. Instead of filling his rod slot with epoxy and bedding his rod in it, this fabricator threw his rod in the hole and covered it in knife grade polyester, hence the pictured voids. You’ve got to grind that rod back away from the sink moisture. I fit a chunk of scrap in the hole and ground and polished it flush. This was done by 12:58.
At 2:13, the cut-out was profiled and polished and I took a short break.

After changing blades in my Festool, the cabinet front was cut to accommodate the sink.
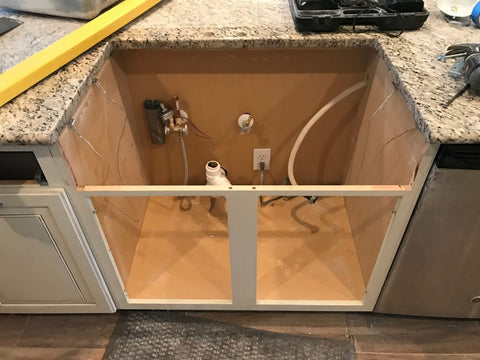
The Hercules Universal Sink Harness is attached to the cabinet sides; however, the altered cabinet front can’t be installed yet because you can’t get the sink in. You can’t put the sink in and tighten the harness without the cabinet front because the cabinet front keeps the cabinet sides from pulling in when the harness is tightened. I put a 4’ level across the cut-out and while clamping the sink in place through the drain hole, put a nice couple of scratches in the bottom of the sink, but got them out before the homeowner saw them. With the sink clamped almost in place but slid forward some, I siliconed the flange, slid the cabinet front up and behind the apron and tapped it back into place then clamped the sink into position and tightened the harness. You should see lots of pretty silicone squeeze-out. I ran a bead of hot melt glue at the back sides of the cabinet front, just like the factory did, then screwed the cabinet front to the adjacent cabinet and dishwasher. The sink was in and the front was on at 3:49.
I went shopping for plumbing at 4:56 and was back at 5:42, only to discover that while I had checked to see if I had glue, I didn’t check to see if the glue I had was good. Luckily there was a hardware store 10 minutes away. The sink was operational at 6:33 and my butt was in my truck seat at 7:15. 9 hours 37 minutes’ total, excluding drive time which was a half hour each way. I’ve done this job at least 5 times now, so your first may take a bit longer.


---------------------------------------------------------------------------------------------------
When we read through this, we felt we had to share.
If you are in a similar predicament and are in the Sarasota Florida or Atlanta Georgia area, reach out to Joe at Ihatemysink.com.
Kraus has been, and continues to be, one of our most recommended brands for several reasons. The Kraus product quality is consistently high. On par and often exceeding the finish, features, and styles of brands priced a lot higher. Speaking of which, the brand is priced extremely well. Kraus’ popularity has grown exponentially and demand for their sinks and faucets is not slowing down. This leads us here: Questions and Answers about Kraus that, we at DirectSinks, are asked quite often. If you have other questions not mentioned below, please call, email, or stop in!
Kraus was founded in 2007. They are headquartered in Port Washington, NY.
Really good actually! The majority of Kraus Kitchen Sinks are made of 16-gauge stainless steel, which is more than adequate regarding thickness of the metal. The sinks have a generous amount of undercoating and padding which results in a very quiet sink. The faucets are very well made and easy to install. We recommend their products to our own friends and family, and we also have their sinks, faucets, and accessories in our own homes.
Kraus' Full Warranty can be seen here
We Summarized the Kitchen Sink and Faucet Info Below
Faucet Warranty - Lifetime Limited Warranty
Kraus USA Plumbing, LLC (“Kraus”) extends this warranty to the original purchaser for personal household use of the Faucet when purchased from an authorized Kraus dealer and in the location of original installation. This warranty is non-transferable.Kraus warrants the structure and finish of the Faucet to be free from defects in material and workmanship under normal usage for as long as the original purchaser resides in the residence in which the Faucet was first installed.
Kraus warrants the Faucet's sprayhead assembly (including the engine, aerators, structure, restrictors, back flow preventers, sprayer hoses, braided supply line hoses which encompasses nylon, silicon and stainless steel) of the product to be free from defects in material and workmanship under normal usage for a period of one (1) year from the date of purchase.
Kraus warrants the Faucet's cartridge to be free from defects in material and workmanship under normal usage for a period of five (5) years from the date of purchase.
Any product reported to the authorized dealer or to Kraus as being defective within the warranty period will be repaired or replaced with a product of equal value at the option of Kraus.
Kitchen Sink Warranty - Lifetime Limited Warranty
Kraus USA Plumbing, LLC (“Kraus”) extends this warranty to the original purchaser for personal household use of the Kitchen Sink when purchased from a Kraus authorized dealer and in the location of original installation. This warranty is non-transferable.Kraus warrants the structure and finish of the Kitchen Sink to be free from defects in material and workmanship under normal usage for as long as the original purchaser resides in the residence in which the sink was Kitchen Sink was first installed.
Any product reported to the authorized dealer or to Kraus as being defective within the warranty period will be repaired or replaced with a product of equal value at the option of Kraus.
Absolutely. If you call their offices, they actually pick up. If you write in, they respond.
Business Hours: Monday - Friday 9:00am to 8:00pm (EST)Not normally. First, if you dig into the internet deep enough, you will find a complaint about every sink brand and rust.
Kraus is often mentioned simply because of the popularity of the brand.
Most frequently, something that looks like rust shows up in the first few weeks after the sink is installed.
Why? During the countertop fabrication process a very fine dust is created (like sawdust from wood, but very fine). If this dust is on the sink after installation and gets wet, it may show oxidation on the surface of the sink.We see this as the most common cause. Typically after the sink is thoroughly cleaned after installation, no stains will show up. Another situation that can cause a stain or mark is if something is left in the sink and it's wet, especially flatware, pots and pans, and steel wool. The composition of your water can also contribute to this. Water with high iron content will leave stains frequently.
Really great information about this can be found here, at Bar Keepers Friend
Kraus typically has the items shipped in 2-3 days. Most items will ship with UPS from their New Jersey warehouse. Some small items, such as faucets or accessories may ship out of their N.Y. location.
No, unfortunately our clients can not pick up from Kraus
DirectSinks will often have various faucets and sinks at our location. Generally, these items are stocked for our local clients such Kitchen and Bath Designers, Builders, and Countertop fabricators. If you are on Long Island and want to pick up something from us, please call first. We do not keep stock of everything. Please call and ask before making the trip!
Normally, you won't find Kraus on display. However, exceptions are out there. We have several Kraus faucets and sinks on display in our Cabinet Showroom. Some of our local Kitchen and Bath clients also show some various Kraus items.
| Kraus | Ruvati | Advantage | |
|---|---|---|---|
| Overall Quality | Excellent | Excellent | Both Great |
| Warranty | Limited Lifetime | Limited Lifetime | Both Great |
| Availability |
|
|
✓ Kraus |
| Customer Service | Consistently Excellent with Great Communication | Inconsistent & lack communication | ✓ Kraus |
| Style & Design | Vast Selection of Kitchen Sinks and Faucets Decent, but more common bathroom sink designs |
Vast Selection of Kitchen Sinks, No Faucets Large Varity of Bathroom Sink Options with many unique options, including stainless steel. No Bathroom Faucets |
✓ Kraus if you need a Kitchen Sink & Faucet ✓ Ruvati if you are looking for a Bathroom Sink |
| Value and Price | 30" Small Radius Undermount Sink KHU100-30, Standard Online Price $329.95 Often has Sales. In this exact example, the Kraus sink has been on sale for less than the Ruvati |
30" Small Radius Undermount Sink RVH7300, Standard Online Price $299.00 Infrequently has Sales |
Can go either way. Kraus often has sales that bring this example to their advantage Check the current pricing with the links below: Kraus KHU100-30 Ruvati RVH7300 |